 Volume
2, Number 2, 2015, R3–R10 journal homepage:
region.ersa.org
Volume
2, Number 2, 2015, R3–R10 journal homepage:
region.ersa.orgDOI: 10.18335/region.v2i2.98
Making Educational and Scholarly Videos with Screen Capture Software
1 North Carolina A&T State University, Greensboro, NC, USA (email: burkeym@ncat.edu) Received: 9 November 2015/Accepted: 9 November 2015Abstract. This resource describes several options for making educational videos using “screencasting”, or “screen capture” software. The author, who has over 300 screencasted videos on YouTube and indexed on his website www.burkeyacademy.com, describes the software and hardware tools needed, including some open source and free-to-use tools. Links to some “how to” videos are included, as well as some links to other example videos demonstrating novel professional uses for screencasting.
1 Overview
Video has truly evolved into a powerful tool in education over the last decade. While instructors have been showing educational films for many decades, evolving from film to VHS and DVDs, these videos have until recently been costly to produce and distribute. With the advent of YouTube, distribution of videos became much easier, yet most faculty were stuck in the mindset that an educational video ought to consist of a video of a professor at a chalkboard, mimicking a standard classroom setting.
In 2006 Sal Kahn, MIT graduate and founder of the now-famous Kahn Academy, began to change this perception. With his simple style of digitally hand - writing brightly colored text on a black background, the user is virtually looking over his shoulder as he talks them through math problems. Using a digital graphics tablet and stylus, he drew letters, numbers, and simple pictures on his screen, capturing this image along with his voice in order to help his younger relatives learn basic mathematics. Soon his videos exploded in popularity: there was a craving for this kind of educational content. Soon, many imitators followed, including myself in 2010.
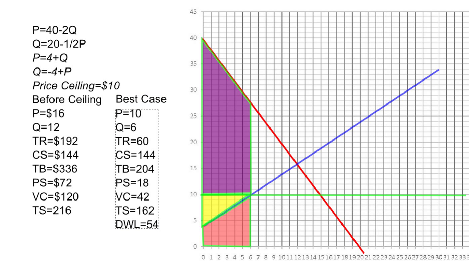
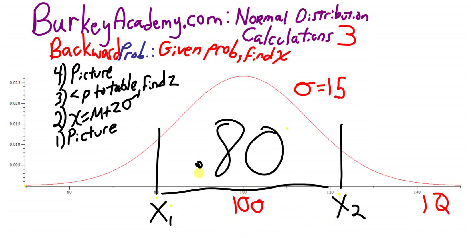
The great advantage of screencasting lies in its flexibility. Anything that can be shown on a computer monitor can be captured: text, drawings, real-time use of statistical or mapping software, animations, PowerPoint slides, or even other video clips. Some examples can be seen in some still images taken from the author’s videos in Figures 1–3.

This technology can prove valuable as a lecture component for online courses, for supplemental or remedial instruction outside the classroom, or for “flipping the classroom” (i.e. having students view lectures outside of class, so that in-class time can be used for solving and discussing problems (Berrett 2012)). Pedagogical studies have found that the supplemental material can have measurable benefits (Evans Jr. 2011, Vondracek 2011). Additionally, novel uses are still being developed: for example, Thompson, Lee (2012) record videos while reading their students’ papers in order to give more conversational (and thus more instructive) feedback to students than scribbles in the margins of a paper can provide.
Regional science is by its nature a highly visual field, and one that demands that students and teachers familiarize themselves with a wide variety of software tools such as GIS and statistical software. Screencasting is a wonderful way to demonstrate the use of these tools, and to share many types of research-related visualizations that may not be nearly as effective in a static print form. In this paper I will outline the basic software and hardware tools that one can use to create screencasting videos. Then, I will give some helpful tips and best practices for those starting out with these tools. Lastly, I will provide links to several examples of innovative uses of screencasting videos, including video supplements to journal articles, and instructional videos that will help you make instructional videos!
2 Tools of the Trade
Please don’t be intimidated by the volume of the details below. If you want to save the details for later, please skip to section 3 or just watch the “Getting Started” videos listed at the end of this document. It is easy to get mired in the details and give up, but I encourage you to just make your first video – the details can wait.
2.1 Hardware
I use Windows PCs for making my videos, so that will be the focus of my discussion.1 For recording low resolution videos (e.g. 800x600 or less), a basic, older PC should do the trick. However, if you want to capture your entire monitor at 1920x1080 while making maps in ArcGIS, then a beefier computer is called for.
No matter what kind of videos you plan on making, a decent-quality microphone is a must. I recommend using a USB headset, with a headphone and boom microphone that can be adjusted. A USB connection normally provides cleaner audio than 3.5mm plugs, though these headsets cost a bit more. However, Logitech makes several nice units (e.g. PC960, H340, H390) that can be bought for between 20-40 Euro at your favorite online retailer, though many other good manufacturers can be found.
If your goal is to capture a voiceover for PowerPoint, or demonstrate software usage, then this is all you need on the hardware side. However, what if you want to draw, derive equations, or do other writing-intensive tasks? One common option is to simply use a webcam to film as you write on a piece of paper and describe what you are doing.2 Another option (that Sal Kahn uses) is to purchase a “digitizing graphics tablet” (e.g. the Huion H610 Pro). This is basically a large version of a laptop touchpad with a stylus-pen for precise input. The downside is that, although the input shows up on your computer monitor, it can be difficult to learn the hand-eye coordination required, since when one writes with the stylus nothing is written on the writing surface itself.
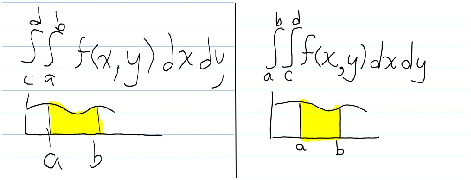
Many newer laptops have touch screens, and touch displays are available for desktops as well. People commonly use these for drawing or writing, using a finger or a passive stylus (similar to a rubber pencil eraser). This method works well unless accurate writing is required (imagine trying to write the limits of a double integral with an eraser on a laptop screen). A tool I use is a laptop that is designed with both a touch screen and an active-digitizing stylus. This battery-powered stylus is extremely precise, but laptops with this design are fairly uncommon, and command a premium (particularly for ones with enough power to run software while recording HD video on the fly).3 See Figure 4 for a comparison of using the active versus the passive stylus.
When it comes to investing in hardware I would advise going slowly—practice making videos on your existing hardware, and make sure you understand what you really need before investing in anything new.
2.2 Software
There are three main software components you will need: Screen Capture Software, a CoDec, and video editing software. The main piece of software needed is the Screen Capture Software itself. For many years I have used the open source, free software, CamStudio. However, there are two problems with this software:
- 1.
- It no longer appears to be maintained regularly.
- 2.
- It has occasionally offered to install unwanted software as well, doing so even when you opt out.
Other free options that seem to work well are HyperCam and Screencast-O-Matic. Of course, there are many options for buying software for screen recording: Camtasia (by Techsmith) and Captivate (by Adobe) both seem to work well, and of course there are many others.
A critical piece of software that works with your Screen Capture Software is a good video CoDec – short for Coder/Decoder. This software works behind the scenes to compress your video, balancing quality with size. PCs come with some basic, poor quality Codecs pre-installed (e.g. Microsoft Video 1). Well-known commercial CoDecs are DivX’s H.264 and H.265, commonly used to compress high quality video into a small file size. There are many free CoDecs out there as well, but the one I recommend is XVID (a sort of reverse-engineered H.264). It provides great quality video for the file size. Commercial Screen Capture Software will normally come with its own, good quality CoDec.
Another piece of software that you will need at some point is video editing software.4 Again, the options abound, from Windows Movie Maker to higher-end products. The two basic tasks you might want to be able to accomplish are a) trimming off part of a video, and b) joining two pieces of video together. After making a video for 10 minutes, suppose something goes wrong. Simply stop the video, and cut out the mistake. Make a second clip finishing the video, and then join the two pieces together. I will give you one open source, free option: VDub. This program is difficult unless you have someone show you how it works, so I have included a link to a brief tutorial at the end of this document!5
Another piece of software that you might want is something to help you make drawings on the fly. If you are using a mouse and want to draw mostly simple shapes (e.g. graphing lines), I recommend the free, open source Inkscape. If you are using a digitizing tablet or laptop with stylus, I like Windows Journal, or alternatively, Microsoft OneNote).
3 How To Do It!
3.1 Just do it!
People often ask me “How long does it take to write the script for one of your videos?” My answers is, “Zero”. My philosophy is that I am not making “art”, I am conveying information. I do not write a “script” when I give a lecture, and so don’t write one when making a video. Most of us do not have time to spend several hours making a 15 minute video!
The most common type of video I make is right after teaching a class on a topic. Suppose we are reviewing supply and demand. I come back to my office after class, and go through the same basic material using screencasting. The ideas are still fresh in my head, and I just decide how to break the material up into manageable chunks and perhaps make three shorter videos: perhaps “Supply”, “Demand”, and “Equilibrium”.
If I am doing a video on a new topic (not right after class), then sometimes I will type a brief outline to organize my thoughts before I get going. The best advice I can give is this: Do not make perfection your goal when making a video — your goal is to provide resources for your students and/or colleagues and you need to balance quality with the quantity of videos you can make.
3.2 Where the videos will go
At some point you need to decide where you will post your videos. Personally, I host all of my videos on YouTube. Additionally, I have a website that organizes my videos by topic, making it a bit easier to find what you are looking for than it can be on YouTube alone. YouTube has several advantages and features:
- 1.
- Wide distribution.
- 2.
- Ability to organize multiple videos into “playlists”, of either your own videos or a mixture of your own and others’ videos.
- 3.
- The ability to set videos as “unlisted” – that is, they do not have to be for public consumption. You can make a video for a colleague or for just your students by sharing the link with only those who you want to see the video.
However, you may want to host videos on your own site or server, or on your university’s Learning Management System (LMS) (e.g. Blackboard or Moodle), if your videos will be primarily for in-house consumption. Note that YouTube will limit the length of your videos to 15 minutes or less until you verify your account using a valid phone number.
3.3 Best practices
There is a preference in the “video marketplace” for shorter videos in the 5-10 minute range. I try to be mindful of this, but at the same time realize that many topics simply cannot be explored in such a brief amount of time – most of my videos are in the 15-30 minute range. However, if there is a way to slice a topic into shorter bits, it will make it easier on the presenter as well as the viewer.
You need to decide the size of your “capture window” (i.e. how large, and how high resolution do you want your videos to be?). After some trial and error, you probably want to decide on a consistent choice for your videos – this will make future editing and combining of videos easier and more visually appealing. Standard sizes are 1280x720 or 1920x1080 for HD videos, or 854x480 for lower resolution videos. These dimensions all have the 1.78:1 widescreen ratio that is common on most modern devices and TVs.
My desktop monitors have a resolution of 1920x1080, and generally I will capture a window of around 1700x950. This allows the window to cut off the top and bottom window borders and margins of many software packages, leaves some room on the right side of the screen “off camera”, and approximately keeps the 1.78:1 ratio. In the “off camera” area I will often place pre-made images or equations I can drag into the filmed area, or windows for other software that I want to drag into the frame at various points in the video.
As mentioned previously, don’t over-prepare for a video, and don’t shoot for perfection. However, you should be prepared enough that you:
- 1.
- Don’t make too many mistakes.
- 2.
- Don’t leave long, empty silences (you can pause the recording for a moment to collect your thoughts.
- 3.
- Don’t fill silence with “ummm” or “ahhh”, just as when public speaking!
4 Why Make Videos?
4.1 Videos for education
Now we discuss several interesting uses of Screen Capture Videos. The easiest way to get started is by making brief review videos for classes you already teach, covering the basic ideas rapidly, and perhaps going through the same or a similar example model, calculation, etc. This is especially useful when presenting the use of software when the course is not taught in a computer lab, and students may not have laptops in class with the software installed. These videos also prove their usefulness when students miss class, or when the professor must miss class or classes are cancelled.
However, videos like these are also very useful for students to review material before tests. When making these “review videos”, you probably want to cover the same material in a much shorter time frame than a normal lecture for several reasons:
- 1.
- For most of your students, this will be a review.
- 2.
- Unlike in a classroom setting, time will not be used answering student questions.
- 3.
- You can cover material much more quickly without fear that a student might miss something, for videos can be rewound and watched again.
- 4.
- If you post these videos on YouTube for public consumption then many students looking for multiple perspectives or examples will already be familiar with the topic from their own classes.
4.2 Videos for colleagues or yourself
“Best practices” in research calls for good documentation: not just so that others can replicate your work, but so that you and your colleagues can remember and understand your process for creating that work. I sometimes find that it is easier to make a one minute video documenting which projection, datasets, tools, or transformations I used in a certain portion of a project, rather than writing it all down.
Regional Science Researchers are also known for using a wide array of software tools, and we are generous in sharing our code with colleagues. However, most of us are not proficient in Stata, SAS, Matlab, GAMS, ArcGIS, Python, R, and [insert one of dozens of options here]. Suppose you release a new package in R: it almost seems a requirement to supply cryptic, hard to follow documentation and examples. Including a link to a 10 minute video explaining the features, showing an example, and interpreting the output would be a great supplement for your potential “customers”.
4.3 Videos as supplements to journal articles, and guides for authors
During my time as co-editor of The Review of Regional Studies, I have experimented with using screen capture videos in two ways. First, I experimented with making what one might call a “Video Abstract” for a research paper.6 This gives authors the opportunity to give an overview of the paper in a more user-friendly, and perhaps more informative method than the typical abstract.
Also, similar to REGION, The Review of Regional Studies uses the Open Journal System (OJS) software for publishing. While this free system is wonderful in many respects, some operations are counterintuitive, especially for authors and reviewers who are unfamiliar with the platform. Thus, editors spend a lot of time fielding questions and correcting errors. The most common remedy is to type up several how-to guides with screenshots to help users register, submit, and review papers.7 Instead, I have created several 5-10 minute videos to help authors understand how to register and submit a paper, submit revisions, and use our formatting template, for example.8
5 Conclusion
In this paper I have briefly introduced some of the tools, methods, and uses of Screen Capture Videos for educational and research use. Below I list links to some videos I made demonstrating how to make, edit, and post videos to YouTube using some free software tools.
YouTube Videos about making YouTube Videos
These videos focus on the Windows environment:
- Video 1:
- About CoDecs: Install XVID Codec (optional, but will make smaller, sharper videos): https://youtu.be/tnAtLnT-cE4
- Video 2:
- Using free HyperCam2 to record a basic video: https://youtu.be/i734w1SyMF4
- Video 3:
- Using VDub to edit videos (cut off mistake, combine with second video segment): https://youtu.be/alkL0I˙1dks
- Video 4:
- Post video to YouTube: https://youtu.be/EJqV2b4MqtU
Information on Other Platforms
On a Mac, the built-in QuickTime player also has the capability of recording video of your desktop. An additional benefit of this is that if you decide to purchase Camtasia, the price is much lower for Mac users! See https://support.apple.com/en-us/HT201066 for basic instructions.
On Linux, there are several free alternatives. They are listed at the following website: http://community.linuxmint.com/tutorial/view/1229
References
Berrett D (2012) How ‘flipping’ the classroom can improve the traditional lecture. The Chronicle of Higher Education 12: 1–14. http://chronicle.com/article/How-Flipping-the-Classroom/130857/
Evans Jr. D (2011) Using embryology screencasts: A useful addition to the student learning experience? Anatomical Sciences Education 4: 57–63. CrossRef.
Thompson R, Lee M (2012) Talking with students through screencasting: Experimentations with video feedback to improve student learning. The Journal of Interactive Technology and Pedagogy 1. http://jitp.commons.gc.cuny.edu/talking-with-students-through-screencasting-experimentations-with-video-feedback-to-improve-student-learning/
Vondracek M (2011) Screencasts for physics students. Physics Teacher 49: 84–85. CrossRef.